I thought adding a collaborative twist on this would be a fun idea so let's give it a shot yeah?
For this one I want suggestions or ideas of what you would like me to draw. I'll take at least the first 5 suggestions from followers. I'll make a post with your drawings and links to your blog and all that. The only thing I will say is if the suggestion is too offensive I won't do it. If you are one of the first 5 and it is too offensive I'll ask for a suggestion of something else and draw that. I am a citizen of the internet so at this point it is hard to offend me personally but I have to use my best judgment for the sake of the blog.
Anyway, first 5 I will definitely do. After that, it's a matter of if I feel like doing more or not. I've consistently done more than 5 so it's worth your time to make a suggestion after that 5 mark. I'll probably just draw the suggestions I like after that. Who knows? I'll post the results Tuesday or Wednesday.
Good luck and I'm excited to see what you come up with!
Showing posts with label hobby. Show all posts
Showing posts with label hobby. Show all posts
Sunday, August 7, 2011
Friday, July 29, 2011
Playing Card Gift Boxes Part 2
*First and foremost I wanted to say how happy I am that everyone has enjoyed my drawings as much as they have. You all give me all these different unique windows into your world and I get a huge kick out of it. I really like the idea of having something to give back to the community. I feel like you deserve it. I'll definitely make a point to do this again sometime. Probably in the next week or two. *
Anyway, this is a follow up to my playing card gift box tutorial. In part one I covered the basic cube box. In part 2 we'll go over how to construct a double wide box with a handle in the lid. This article assumes you have already read part 1 and are familiar with the concepts taught in it.
 To start with a double wide box you'll need to make 10 walls total. Once you've made 10 walls total take three walls and join them with 2 connectors as shown.
Repeat so you have two sets of 3 walls joined. These will make up the front back and sides of your box.
 Next you're going to take a wall and stick 3 connectors in it as shown. Repeat. These will make up the bottom of your box.
 Match up the connectors and insert them into your sets of 3 walls.
 You should end up with two halves that look something like this.
 Insert three connectors into one of these halves as shown. It is not necessary to fold these particular connectors but you can if you'd like.
 Insert these connectors into your other half as shown and push the halves together...
 You'll have something like this going on now.
 Next to make the lid take one wall and insert a connector halfway in. Again this one need not be folded. In this case I have the back of the connector facing toward the bottom which. This will make sense in a moment. Let's move on to the handle.
 Take a card and fold in half length in on it's face.
 Then fold the outside halves the opposite way toward the center of the card. You'll have a card folded into 4 equal parts that looks like a W when you pull it apart.
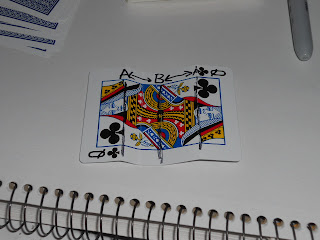 Next you take these two edges at the bottom of this 'W' and fold them face inward toward the center. Hopefully my drawing on the card here helps.
 Your card should look like this now.
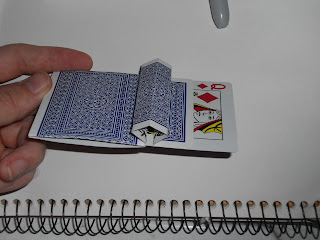 This is your handle and it is going to go on top of the connector as shown. Insert these connectors into the other wall to have your lid.
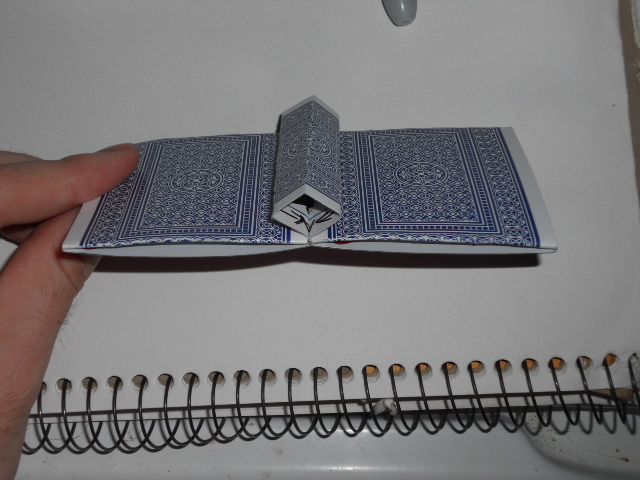
 This is your lid!
 All you have to do now is insert two connectors into your lid then insert those into your box. Or insert the connectors into your box then into your lid. Do whatever. Freestyle that hoe.
 They go in like so.
 ...and bang. Finished product. In all of it's glory.
Using the principles in part 1 and 2 you can go nuts creating all kinds of boxes. I've never gone beyond a double wide myself but I've seen some big, crazy looking ones. I will do a part three in the future covering handles for single wide boxes and lips to allow the box to shut more securely. Anyone kind of try this project out and post pictures let me know and I'll give you a shout out. Also, stay tuned next week for another chance to get a drawing done.
As always I try to make these directions as clear as I can but if you are having trouble with something feel free to let me know.
Anyway, this is a follow up to my playing card gift box tutorial. In part one I covered the basic cube box. In part 2 we'll go over how to construct a double wide box with a handle in the lid. This article assumes you have already read part 1 and are familiar with the concepts taught in it.
 To start with a double wide box you'll need to make 10 walls total. Once you've made 10 walls total take three walls and join them with 2 connectors as shown.
Repeat so you have two sets of 3 walls joined. These will make up the front back and sides of your box.


Using the principles in part 1 and 2 you can go nuts creating all kinds of boxes. I've never gone beyond a double wide myself but I've seen some big, crazy looking ones. I will do a part three in the future covering handles for single wide boxes and lips to allow the box to shut more securely. Anyone kind of try this project out and post pictures let me know and I'll give you a shout out. Also, stay tuned next week for another chance to get a drawing done.
As always I try to make these directions as clear as I can but if you are having trouble with something feel free to let me know.
Subscribe to:
Comments (Atom)