So yeah in case you haven't noticed I've kind of sucked at blogger lately.
I'm sorry.
I just recently got this job as an assistant manager of an arcade.
The good news is soon I'll be able to do all those fun things I enjoy again like eating.
The bad news is I have considerably less free time so I'll probably continue to suck at blogger.
Anyway, fun part.
Throw an idea or request at me and I'll do my best to draw it. First 5, absolutely. First 10, probably so.
I can't say for sure when I'll have them done right now but it'll be a fun surprise when you do see it yeah?
1 2 3 go.
Showing posts with label fun. Show all posts
Showing posts with label fun. Show all posts
Saturday, August 20, 2011
Monday, August 15, 2011
Turntable.fm group sesh?
Thought it might be a fun idea to organize some kind of group chat thing on turntable.fm one day. If you aren't familiar with it check my previous post. Like we could work out some kind of date or maybe a few days from now I'll just post a link to a room and I'll hang out there for a few hours or whatever. If any of you guys think to do something similar I'll keep an eye out and pop in if I see one.
Any thought on the matter? I've been all up on turntable since I found out.
Crap, I should probably crank out some drawings for you guys soon also huh? MAYBE I'LL INCORPORATE THE TOO *GASP* But yeah, thoughts?
Any thought on the matter? I've been all up on turntable since I found out.
Crap, I should probably crank out some drawings for you guys soon also huh? MAYBE I'LL INCORPORATE THE TOO *GASP* But yeah, thoughts?
Friday, August 12, 2011
Anyone Turntable?
This kind of post is a little bit off topic for me but it is fun and this is the fun blog so yeah.
I've recently been spending a LOT of time on this new thing turntable.fm
 It is so absurdly fun. I'll try to explain this as best as I can. You have a little avatar and a playlist that you manage. You can search their library for songs and/or upload your own songs. You go into chatrooms which can have up to 5 djs at a time and it plays one song by each dj on stage in rotation. People can vote your song as awesome or lame and you get dj points and you can become a fan of djs. So far dj points just equal to unlocking more avatars but still, that's pretty cool. Here is a screen shot to give you some kind of idea.
I feel like this is right up some blogger's alleys especially *cough cough* Electric Addict and D4 *cough cough*.
But really this can be fun for anyone. Have a group chat with some friends and share music with each other or go in other rooms and meet new people and learn about new music that way.
This is seriously. The coolest thing I've seen in so long. I can't over state it.
Anyone else been having fun with this thing? My name on there is Its Haunter so if you see me say hi.
I've recently been spending a LOT of time on this new thing turntable.fm

I feel like this is right up some blogger's alleys especially *cough cough* Electric Addict and D4 *cough cough*.
But really this can be fun for anyone. Have a group chat with some friends and share music with each other or go in other rooms and meet new people and learn about new music that way.
This is seriously. The coolest thing I've seen in so long. I can't over state it.
Anyone else been having fun with this thing? My name on there is Its Haunter so if you see me say hi.
Wednesday, August 10, 2011
Challenge Edition Results Part 1
I think I'll break it down like this. I'll have the person's blog, their idea, and the drawing. Thanks for all the ideas guys. Some are okay, some aren't. Some ideas I took a few stabs at just for kicks because I wasn't really happy with how one or the other turned out or I was just having fun. Also, I'm out of drawing paper so I had to use an old spiral notebook I found so...sorry about that I guess. We'll do part 1 today and part 2 either later today or tomorrow. Depending how ambitious I feel.
 GMSoccerPicks: I think you should be a guest drawer for my Dino Neymar comic and it should be feature in both blogs. Take a look, i would love a collaboration from you, perhaps a redraw for Dino Neymar or a new character. Look http://www.gmsoccerpicks.com/2011/08/dino-neymar-vs-poneymar-round-1.html

my day in a sentence:


D4:


 GMSoccerPicks: I think you should be a guest drawer for my Dino Neymar comic and it should be feature in both blogs. Take a look, i would love a collaboration from you, perhaps a redraw for Dino Neymar or a new character. Look http://www.gmsoccerpicks.com/2011/08/dino-neymar-vs-poneymar-round-1.html
my day in a sentence:


This might sound weird. But, anyways.
I'd love you to do a drawing of one Freddie Mercury, the late Queen frontman. And the duke of epicness. ;)
I believe your rendition of this rock god could be really cool. :D
I'd love you to do a drawing of one Freddie Mercury, the late Queen frontman. And the duke of epicness. ;)
I believe your rendition of this rock god could be really cool. :D


Draw Zooey Deschanel on top of the statue of liberty. Pweeeze!

Sure, I'll bite, A dragon crawling through an eyesocket.
I'll leave it at that for now. I think I managed to draw for everyone that's made a suggestion so be on the look out for part 2! Sorry if the layout is weird. This post editing thing is so wonky sometimes.
Friday, July 29, 2011
Playing Card Gift Boxes Part 2
*First and foremost I wanted to say how happy I am that everyone has enjoyed my drawings as much as they have. You all give me all these different unique windows into your world and I get a huge kick out of it. I really like the idea of having something to give back to the community. I feel like you deserve it. I'll definitely make a point to do this again sometime. Probably in the next week or two. *
Anyway, this is a follow up to my playing card gift box tutorial. In part one I covered the basic cube box. In part 2 we'll go over how to construct a double wide box with a handle in the lid. This article assumes you have already read part 1 and are familiar with the concepts taught in it.
 To start with a double wide box you'll need to make 10 walls total. Once you've made 10 walls total take three walls and join them with 2 connectors as shown.
Repeat so you have two sets of 3 walls joined. These will make up the front back and sides of your box.
 Next you're going to take a wall and stick 3 connectors in it as shown. Repeat. These will make up the bottom of your box.
 Match up the connectors and insert them into your sets of 3 walls.
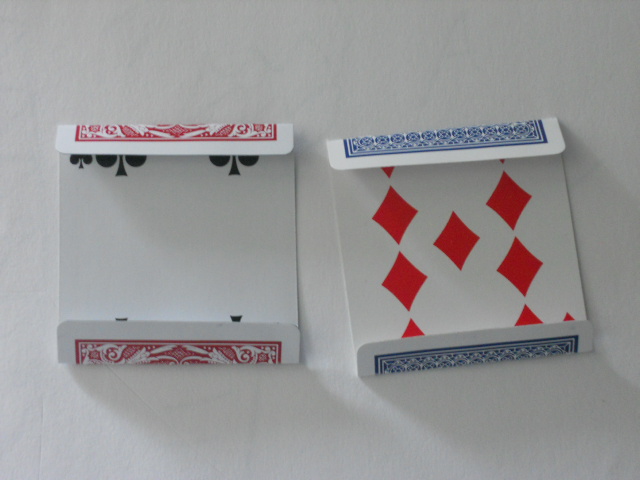
 You should end up with two halves that look something like this.
 Insert three connectors into one of these halves as shown. It is not necessary to fold these particular connectors but you can if you'd like.
 Insert these connectors into your other half as shown and push the halves together...
 You'll have something like this going on now.
 Next to make the lid take one wall and insert a connector halfway in. Again this one need not be folded. In this case I have the back of the connector facing toward the bottom which. This will make sense in a moment. Let's move on to the handle.
 Take a card and fold in half length in on it's face.
 Then fold the outside halves the opposite way toward the center of the card. You'll have a card folded into 4 equal parts that looks like a W when you pull it apart.
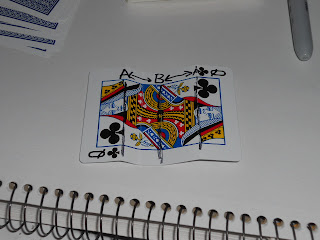 Next you take these two edges at the bottom of this 'W' and fold them face inward toward the center. Hopefully my drawing on the card here helps.
 Your card should look like this now.
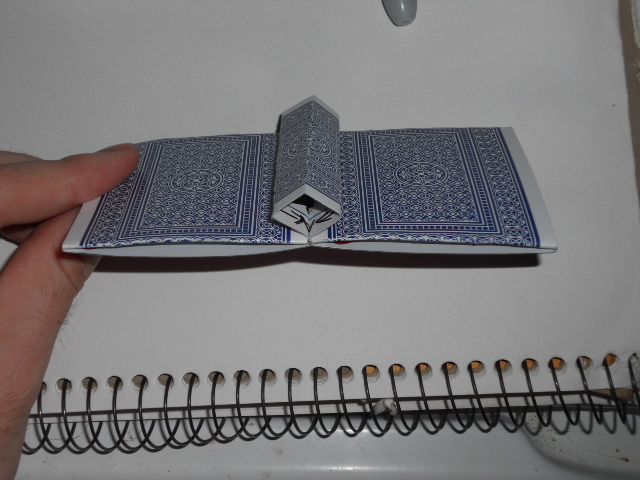
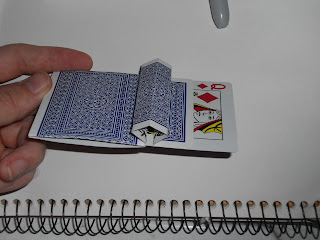 This is your handle and it is going to go on top of the connector as shown. Insert these connectors into the other wall to have your lid.
 This is your lid!
 All you have to do now is insert two connectors into your lid then insert those into your box. Or insert the connectors into your box then into your lid. Do whatever. Freestyle that hoe.
 They go in like so.
 ...and bang. Finished product. In all of it's glory.
Using the principles in part 1 and 2 you can go nuts creating all kinds of boxes. I've never gone beyond a double wide myself but I've seen some big, crazy looking ones. I will do a part three in the future covering handles for single wide boxes and lips to allow the box to shut more securely. Anyone kind of try this project out and post pictures let me know and I'll give you a shout out. Also, stay tuned next week for another chance to get a drawing done.
As always I try to make these directions as clear as I can but if you are having trouble with something feel free to let me know.
Anyway, this is a follow up to my playing card gift box tutorial. In part one I covered the basic cube box. In part 2 we'll go over how to construct a double wide box with a handle in the lid. This article assumes you have already read part 1 and are familiar with the concepts taught in it.
 To start with a double wide box you'll need to make 10 walls total. Once you've made 10 walls total take three walls and join them with 2 connectors as shown.
Repeat so you have two sets of 3 walls joined. These will make up the front back and sides of your box.


Using the principles in part 1 and 2 you can go nuts creating all kinds of boxes. I've never gone beyond a double wide myself but I've seen some big, crazy looking ones. I will do a part three in the future covering handles for single wide boxes and lips to allow the box to shut more securely. Anyone kind of try this project out and post pictures let me know and I'll give you a shout out. Also, stay tuned next week for another chance to get a drawing done.
As always I try to make these directions as clear as I can but if you are having trouble with something feel free to let me know.
Sunday, July 24, 2011
Quick post
So I was thinking I haven't done any of my crappy drawings in a while and at the same time thought I'd make an attempt to give back to the readers and followers. Tell you what I'mma gonna do. If you follow my blog and would like one of my drawings, just leave a comment saying so. If you don't follow me yet then...do that and then comment. These are some of my drawings to give you an idea. I'm not sure how many drawings I will do, at least 5. After 5 it's just whenever I get bored of doing them.
What I'll do is look at your blog and use that as some kind of inspiration to draw something. In my next post I'll have all the drawings I did with a link back to your blog under the picture for you. Sound good? 1,2,3 go.
Self Portrait

What I'll do is look at your blog and use that as some kind of inspiration to draw something. In my next post I'll have all the drawings I did with a link back to your blog under the picture for you. Sound good? 1,2,3 go.
Self Portrait

Diana

Friday, July 22, 2011
Playing Card Gift Boxes
What does it do dear readers? Today I'm going to walk you through making your own playing card gift boxes. You can make the boxes in a variety of sizes and styles and can use them to store a variety of things.
What you'll need:
 Playing cards. That's it actually. There are a ton of brands, with a ton of styles. You can get a deck of cards for as little as 1 dollar. These are some varieties I have on hand. Some you would have to order, some you can find in stores. Just check around and see who has what, where.
The major factor is what the back of the cards look like. Most cards made by the United States Playing Card Company have similar faces.

Your box is going to be made of what we'll refer to as WALLS joined together by CONNECTORS.
To construct a wall you need 2 playing cards. For this tutorial I'm using Mavericks in red and Aviators in blue.
1. Arrange the two cards face to face as illustrated. If you would rather have a card featuring the face of a card (say the queens, kings or aces) face outward then have that card's back to the other card's face.

2. Fold the exposed ends of each card over the side of the other card like so. I usually try to keep the folds as even as possible but it's up to you. Keeping them even gives the box a more uniform appearance. You can look at the number on the face of the card as a reference point. When there is an equal amount of the number exposed on both sides it is okay to fold.

It will look something like this.
 You now have two halves.
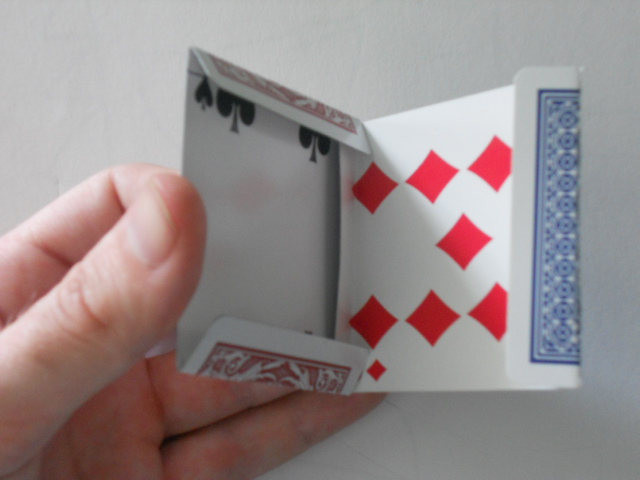
3. Insert the flap from one card into the flaps of the other card as shown.

4. Do the same with the other side of the flap.

You now have a WALL. For the box I'm making I'm using red backs for the inside and blue for the outside so all walls are red on one side and blue on the other.
5. Repeat steps 1-4 until have 6 walls total.

6. To create a CONNECTOR simply fold the card in half.

7. Insert one end of the connector into the slot of your wall like so.
A fine point about connectors: When your box is assembled you will notice the connectors are visible between the walls from the outside. This is another way you can customize your box. In the case of this box I used red backed cards as connectors with the face of the card facing inward. This will create a nice contrast on the outside of the box. If you'd like to have white connectors I suggest saving the 2s and 4s from your deck as connectors and folding them with the white side facing outwards.

8. ...then insert the other end into the other wall.

You now have two joined walls.

9. Repeat the process until you have 4 walls joined as illustrated. Notice I have the red walls facing inward and the blues outward. I also make a point to have all wall pieces in the same direction. In this case all the red walls run horizontally and all the blues run vertically. Again, do it however you'd like to.

10. The bottom is the least fun part to me. Take a wall and insert 2 to 4 connectors. I went with 4 for the sake of having the box look as uniform as possible but only 2 are necessary. Inserting 4 connectors can be a little tricky because the cards have to overlap inside the wall, just be patient. If it takes too long try yelling at it or spitting on it. Fire helps sometimes. Or peanut butter.

11. However many connectors you decide on you have to insert all of them into the square of walls at the same time. Push the bottom in flush and you are almost there!

12. Finally, make one more wall and connect it on one side to make your lid.

Your finished product will look something like this.

This is an example of a larger box I made with some other brands of cards. I use Tally Ho Circle backs and Bees for the interior and Bicycle Shadow Masters for the exterior.

Shadow Masters have a unique joker that looks like death so I had those facing outward at both ends.

I also made a handle of sorts for the top of the lid. It's done by folding a connector into 4ths, folding the two inside 4ths in half again, and uhh...it's kind of hard to explain. I think you can figure it out. If not, let me know I'll take a picture of it later.
These boxes make unique, thoughtful gifts. The impact is high while the cost is relatively low. I love making these for friends.
If you have any questions, thoughts or ideas to kick around let me know. I'll be doing a follow up on this project next week.
Sunday, July 17, 2011
Impromptu Board Game Shenanigans Pt. 2 (DIY Tokens)
This was a fun idea I had just shortly after my board game post. I came up with a really easy and creative way to make your own tokens for your board game. Honestly, you can make these things anyway for any reason. It's pretty fun. I just thought it suits the board game theme.
Things you'll need:
Paper clips, sticky notes and something to draw with

We'll be using the paperclips to act as 'feet' for our tokens. Fold at about a 90 degree angle along the imaginary line where the two ends of the paper clip are. See picture for reference.

The sticky note is going to make up the 'body' of our token. I just used sticky notes because they were lying around but you can make the body with any kind of paper or cardboard. Just substitute tape or glue in. Or don't, whatever. Anyway for a regular 'human' type token you fold the sticky note in half, sticking the sticky stuff to itself.

You'll have something that looks like this...

Draw whatever you want on the front, back whatever. You and your friends could each design your own token to pimp out for all your board games you make. You could cut out pictures of celebrities faces and put them on Batman's body, make your own stuff on your computer and print it out. You can even trim the body down with scissors if you want it to look more uh...whatever you're going for. You don't even have to be able to draw well just have fun with it. See my examples for reference. It's some kind of a knight thing.

Insert the long end of the 'foot' inside the opening of the 'body'. I have the short end stick out the back. Alternatively, you could draw your design first, and tape the entire end of the foot inside of the body before folding the note over in half. Oh you fancy huh?

This is a picture of the finished product. The first picture the flash was too bright but I posted it anyway because my cat showed up.

From left to right: A ghost, me, a knight.

For the ghost I simply folded the body in half long ways and used the foot to connect the fold. With those you don't necessarily need the glue and can still have the upper half of the foot entirely inside the body.
Some ideas to kick around:
-For the smaller tokens you could make monster like ghosts or goblins or your favorite video game monster like bob-ombs or goombas.
-Use different tokens for different roles in the game. Say you and your friends all play regular 'players' but then have someone play a ghost or a knight. That person could have special rules like say they could start with up to 10 coins but can select how many they will use before each roll. Their goal could be to land on the same spot as other players and when they do that player has to go back to home or they lose a point. You could even have some kind of battle system where you both roll to see if you go home or not. If you win maybe the ghost loses a turn or goes back home. Play it out, see what makes the game more fun or challenging or whatever you are going for.
-You could design large intricate monsters with their own special rules.
-You could forget the board game thing completely and just do these for fun. Make tokens of all of your friends or do series, xmen tokens, video game character tokens, monsters, celebs, cartoon characters, movie characters, musicians.
-Recreate scenes from movies or concerts with bands or fight scenes, music videos.
-Make your own tokens for your favorite table top game like D&D or Mechwarrior. I think you could, not sure how those games work really.
The list goes on and on. Guys please, go nuts. Have any ideas to contribute to this? I'd love to hear them. Have fun.
Subscribe to:
Comments (Atom)